How do you put in a graphics card? Whether or not you’re planning to construct an entire new PC from scratch, or just swap out your creaky previous GPU for a shiny new mannequin, there are a number of elements to think about. The precise strategy of bodily slotting a graphics card into your motherboard is easy sufficient, however you additionally want to consider your chosen card’s energy necessities, and even whether or not there’s room for it in your case. We’re right here that will help you keep away from any pitfalls, although, and also you make your GPU improve simple.
For those who’re new to the entire strategy of setting up a brand new recreation rig, your first cease ought to be our intricately detailed information on the best way to construct a gaming PC, the place we take you thru each single step of the method. For GPU suggestions, you can even test our information to the most effective graphics card, the place we take you thru all of the fashions we suggest at a variety of costs, together with a few of the newest Nvidia GeForce playing cards, in addition to some AMD Radeon choices.
For those who don’t know what GPU you’re at present utilizing, you possibly can merely press Home windows key + R and sort “dxdiag” into the search bar. You then simply must click on on the Show tab and all the main points of your GPU will seem. You possibly can then seek for your GPU mannequin on-line, and see the way it compares to different fashions utilizing on-line opinions. I like to recommend trying out my Nvidia GeForce RTX 5090 evaluation should you’re searching for the quickest efficiency potential, and my Radeon RX 9070 XT evaluation should you’re trying to spend round $600.
1. Verify compatibility
That is crucial step, as there are a number of potential pitfalls that may lure you. Firstly, consider it or not, a number of graphics playing cards are too huge to suit into some instances, notably compact ones, so your first job is to seek out out the utmost measurement of graphics card your case can accommodate.
This may often be listed within the specs on your case, generally referred to as most graphics card clearance, however you can even simply use a tape measure to see how a lot uninterrupted area your case offers internally between its back and front.
Subsequent, test your motherboard’s PCIe slot compatibility. The newest graphics playing cards use the PCIe 5.0 interface, and whereas they’ll work fantastic in a PCIe 4.0 slot with solely a small influence on body charges, there shall be a efficiency penalty should you set up a brand new RTX 5000 GPU into an previous PCIe 3.0 slot. Google the complete identify of your motherboard (the identify is often additionally printed on the PCB itself), and test its specs checklist to see which PCIe customary is supported by the highest slot – that’s the full-size slot that’s bodily nearest to the highest of your motherboard.
One other issue right here is should you use a PCIe riser cable in your case to go from the slot to your GPU, maybe for a horizontally-mounted graphics card, or a small type issue system. Some older instances solely have PCIe 3.0 risers (and hardly any have PCIe 5.0 ones proper now), and also you’ll must match the usual of the cable together with your motherboard.
For those who solely have a PCIe 3.0 riser, then your motherboard and GPU will even should be pressured all the way down to PCIe 3.0 to work correctly, even if in case you have a PCIe 5.0 motherboard. You possibly can test our information to the most effective gaming motherboard if it seems such as you want an improve.

Lastly, and that is the large one, you should test that your energy provide is as much as the job. There are two major elements right here – capability and cables. For the previous, Nvidia and AMD each suggest the minimal wattage for every of their GPUs. You’ll want not less than a 1,000W PSU for an RTX 5090, for instance, and an 850W PSU for an RTX 5080. There’s no hazard in having an excessive amount of capability out of your PSU, but when your energy provide can’t sustain together with your GPU’s energy calls for then you definately threat an unstable system, crashes, and presumably a burned-out PSU. Don’t take any dangers right here – do your analysis and ensure your PSU can deal with your new graphics card prior to installing it.
Subsequent, test the facility cables plugged into your graphics card proper now. There are two major forms of GPU energy plug, the primary is a chunky 8-pin block, generally with an element that breaks off to show it right into a 6-pin block. The second is a bigger 16-pin plug, with a block of 12 pins adopted by 4 small pins above it, it is a 12VHPWR connector. There are some others too, together with a 12-pin plug utilized by Nvidia for a few of its RTX 3000 GPUs, however all the newest GPUs both use 6/8-pin or 16-pin sockets.

Have a look at the cables plugged into your current PSU, after which additionally take a look at your energy provide to see if it has another GPU energy cables. In case your PSU is modular, then there could also be further cables within the field for it, or your PC producer could have tied further GPU cables out of the best way behind the motherboard tray in your case (you possibly can see these by eradicating the right-hand facet panel in your case and looking out on the PSU). Have take a look at all of your PSU cables to see what you’ve obtained.
In case your PSU doesn’t have any 16-pin cables, don’t fear, as new 16-pin graphics playing cards all the time include an adapter within the field so you possibly can nonetheless use them with 8-pin cables, however you’ll must ensure you have sufficient of the latter. For instance, you want 4 to plug in an RTX 5090, three for an RTX 5080, and two for an RTX 5070. Rely up the 8-pin energy plugs on your PSU so you could find the restrict of what you possibly can plug into your PSU.

2. Uninstall drivers
Together with your new graphics card ready in its field, it’s now time to undergo the method of uninstalling your current GPU. The only methodology is to press the Home windows key + R and sort “management panel” into the search bar.
This may open the Home windows Management Panel, the place you should click on on Applications or Applications and Options. You possibly can then scroll down the checklist till you discovered both your AMD or Nvidia graphics driver. Proper click on on it, choose Uninstall, and Home windows will take away the motive force.
This methodology can nonetheless use residual traces of previous GPU drivers within the Home windows registry, although, which might generally trigger compatibility issues, notably should you’re upgrading from an AMD GPU to an Nvidia one, or vice versa. To be completely certain that the previous driver has gone, I additionally suggest downloading DDU, which is able to take away each final little bit of your previous GPU driver.
Choose GPU from the menu on the suitable, then the producer of your GPU (Nvidia, AMD, or Intel), then click on the Clear and shutdown button. For the most effective outcomes, you’ll must boot Home windows into Secure Mode earlier than you run it, though Home windows 11 has irritatingly added a component of threat to this course of that may find yourself bricking your PC.

For those who use a PIN slightly than a password to get into Home windows, then booting into Home windows Secure Mode can generally cease you from having the ability to get into Home windows, after which you possibly can’t get previous the login display screen to get out of Secure Mode except you understand how to make use of bcdedit on the Home windows Command Immediate.
For those who’re assured you will get out and in of Home windows Secure Mode with out getting caught, press Home windows Key + R, and sort “msconfig” into the bar. Then click on on the Boot tab, choose Secure Boot with Community chosen, click on on Apply, then click on OK. You possibly can then restart your PC and can boot into Secure Mode. When you’re there, run DDU and also you’ll be capable of completely clear out your GPU driver.
3. Shut down your PC
Together with your drivers uninstalled, shut down your PC from Home windows, after which press the facility button in your PC’s energy provide to make sure there’s no energy going to your system. You possibly can then take the facet panel off your PC case, which ought to come unattached by unscrewing two screws on the again.

4. Unplug cables
Now unplug any cables that go out of your graphics card to your monitor, resembling DisplayPort or HDMI leads. Then it’s time to unplug your graphics card’s energy cables. In all instances, there shall be a clip that secures the plug to the socket, and this must be pushed down whilst you tug on the plug (not the cable) to tug it out of the socket.

5. Take away graphics card
It’s now time to take your oil graphics card out of your machine, so begin by unscrewing the screws or thumbscrews holding it in place behind your case. You’ll want a No.2 Philips screwdriver for this job, even when it’s simply to loosen up the thumbscrews so you possibly can then take away them by hand. Put all of the screws someplace protected, as you’ll want them once more in a minute.

Now you should unlock the latch in your PCIe slot that’s securing your graphics card in place – don’t be tempted to only wrench it out, otherwise you threat taking the entire slot off your motherboard, or not less than damaging it. On older motherboards, the latch shall be on the slot itself, and it could be tough to entry. In these instances, the latch shall be on the finish of the slot, as proven within the above picture, beneath your graphics card, and also you’ll want to carry it down whilst you take away the cardboard.

On some newer boards, there’s a quick-release system that makes life a lot simpler. In these instances, you often must push a button subsequent to the slot on the suitable of the board, as proven within the picture above. Whichever system your motherboard makes use of, maintain one finger pushing down on the latch to maintain your slot unlocked, after which fastidiously elevate your graphics card out of the slot – it’s fantastic to present it a delicate wiggle to assist it out. As soon as it’s out of the slot, put it someplace protected, ideally again in its unique field.

6. Swap cables
Now you should ensure you have all of the cables on your new graphics card, which you recognized in step one. For those who’re upgrading to a brand new Nvidia GPU, and you’ve got 8-pin cables, then hook up the adapter within the field to your current cables, ensuring that every socket is stuffed. For those who want one other 8-pin adapter then plug a brand new one into your PSU and route it by means of your case’s cable routing holes subsequent to your graphics card. After you have the suitable cables prepared on your graphics card, transfer to the subsequent step.

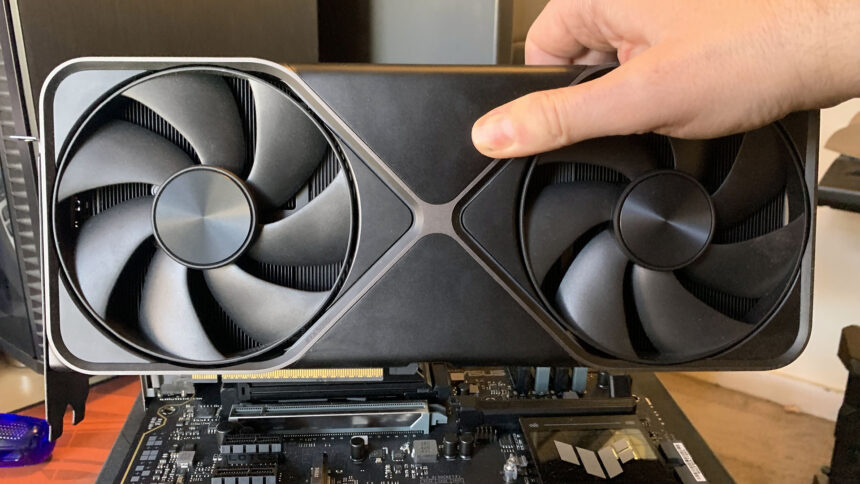
7. Match new graphics card
There’s no must push down the latch to put in your new graphics card, because the mechanism will snap it into place routinely. Gently line up the connector in your graphics card with the highest PCIe slot in your motherboard, place the ends of the steel I/O plate on the again within the area between your motherboard and the again of your case, after which firmly push the graphics card into its slot.

As soon as it’s totally within the slot, and the latch has locked it in place, screw it into your case utilizing the screws or thumbscrews used to safe your previous graphics card. You could must take away one other slot cowl out of your case first in case your new card is larger than your final one.

8. Plug in new cables
Together with your graphics card securely put in, it’s now time to plug all the facility cables into your new card. You’ll have learn varied horror tales about energy cables melting, so it is a step you should ensure you get completely proper. In case your card makes use of six/eight-pin energy connectors, then you definately simply want to verify the two-pin half is true subsequent to the six-pin half for every eight-pin plug (there ought to be a notch to line it up), after which push all of it the best way into the socket, till the clip on the plug is securely over the notch on the socket.
For those who’re putting in a 16-pin 12VHPWR cable, maybe on a brand new Nvidia GPU, then you should ensure that each single eight-pin energy connector hooked up to the adapter is totally totally plugged in, should you’re utilizing one. Then, orientate the plug in order that it’s the right manner up on your graphics card’s socket – it can solely go in a method, and you’ll take a look at the place of the 4 small pins on the highest of the plug to match it up together with your graphics card.

Keep away from any pointless twists and sharp bends with these cables – you need it to only go on to your graphics card with none probability of strain being placed on it which may trigger it to come back unplugged. Push the plug firmly into the socket, and ensure that it’s pushed completely all the best way in, making a click on when the notch on the socket is gripped by the clip on the plug. You shouldn’t be capable of see any of the inside elements of the plug protruding from the socket, so test all of it the best way round, after which test it once more.

Lastly, give it one final push to verify it’s completely plugged all the best way into the socket – you don’t wish to take any dangers right here. Likewise, test that the opposite finish of the cable is plugged securely into your energy provide and any cables plugged into adapters. As soon as all the facility cables are put in, ensure that none of them impede the followers in your graphics card (or certainly another followers in your PC). plug your monitor’s DisplayPort or HDMI cable into the again of the graphics card, and refit your case’s facet panel.
9. Energy on PC
Flip the swap in your PSU so it’s on once more, after which push your PC’s energy button. As you’ve simply modified your {hardware}, it could take a short time besides whereas your motherboard detects the adjustments. Press the Del key in your keyboard regularly whereas your PC is booting, and finally, your PC will take you into your motherboard’s BIOS/EFI setup system.

10. Allow resizable BAR
From right here, there are two options to test within the Superior/PCIe settings. Firstly, ensure that the highest PCIe slot in your motherboard is ready to make use of the newest PCIe model potential, ideally PCIe 5.0 if it’s out there, PCIe 4.0 if not. Secondly, test that resizable BAR is enabled – chances are you’ll must allow above 4G encoding within the PCIe settings earlier than this selection seems. For extra element, you possibly can test our full information on the best way to allow resizable BAR. Save your settings and exit the EFI (often by urgent F10), and your PC will reboot.
If nothing occurs if you swap in your PC, then maintain down the facility button in your PC so it switches off and check out once more. For those who nonetheless get no pleasure, energy down your PC, swap off the PSU once more, take away the graphics card from its slot, and totally set up it once more, ensuring it’s securely in place earlier than attempting to energy it on once more.

11. Set up drivers
Your PC will now boot again into Home windows, and also you’ll must open your browser to get the newest driver on your new GPU. If it’s an Nvidia GPU, then go right here, if it’s an AMD GPU go to this hyperlink, and if it’s an Intel GPU click on on this hyperlink. All of the GPU producers’ driver pages will immediate you for the identify of your GPU and your working system, so put in these particulars, after which obtain the newest driver on your GPU. I
f there’s a alternative of variations, for instance for gaming or studio, decide the gaming one (the GeForce one for Nvidia GPUs). Set up the motive force (it’s fantastic to make use of the Specific set up for these ones), after which restart your PC.
12. Verify GPU-Z
When your PC reboots, obtain GPU-Z and run it to verify your GPU is operating fantastic. It ought to detect your new graphics card’s particulars, and in addition let you know if resizable BAR is enabled or not. Go to the Sensors tab and also you’ll additionally be capable of see the temperature of your GPU and its fan speeds.
13. Get gaming
Now you simply must get pleasure from your improved body charges and visuals out of your new graphics card, so run a demanding recreation, resembling Cyberpunk 2077, push up the settings ,and provides your new GPU a full exercise. Run a recreation with a built-in benchmark, resembling Cyberpunk 2077, and also you’ll be capable of see how the complete capabilities of your new GPU in motion, and in addition ensure that its body charges are inside expectations. Preserve GPU-Z operating within the background whilst you’re doing this, and you’ll then return to the Sensors tab and ensure that your graphics card isn’t overheating.

Can I improve my laptop computer GPU?
You possibly can’t improve the GPU inside your laptop computer, as it is going to be fitted to a proprietary graphics card for that particular machine and its cooling system. Nevertheless, chances are you’ll effectively be capable of improve your laptop computer GPU through the use of an exterior GPU field that connects by way of USB 4 or Thunderbolt, resembling this Asus RTX 5090 field.
Verify that your laptop computer has a USB C port that’s as much as the job, and you’ll give it an enormous GPU enhance. Nevertheless, keep in mind that these packing containers often require an exterior PSU, so you possibly can’t actually use them for gaming on the transfer – they’re extra for plugging into your laptop computer if you’re at house.

Does my PSU want a devoted 12VHPWR cable?
No, any PSU with 8-pin energy plugs can hook as much as your graphics card with a 16-pin 12VHPWR socket utilizing an adapter, which shall be provided together with your graphics card. You can too purchase separate 16-pin 12VHPWR cables that can both plug instantly into your PSU, or work as extension cables that plug into the 8-pin energy cables out of your PSU.
For those who plan to purchase one of many former cables, test (and double-check) that it’s made on your producer and mannequin of PSU – you possibly can’t use an EVGA cable with a Corsair PSU, for instance. PSU producers typically make particular cables 12VHPWR for his or her PSUs, and a few resembling Corsair even present them in a variety of colours.
Different choices are additionally out there from the likes of CableMod, however once more, ensure you purchase a model that’s positively made on your PSU, guarantee it’s plugged firmly into each your PSU and your graphics card, and keep away from making any tight bends with it.
That’s a wrap for our information on the best way to set up your graphics card. For extra PC constructing suggestions, try our full information on the best way to set up a CPU, and our detailed the best way to set up an SSD tutorial.